
ArrayList in Java Video Tutorial
Downloads
ArrayList in Java (Article)
ArrayList in Java (PowerPoint)
ArrayList in Java (Keynote)
Download the Code Sample:
ArrayListTest
This article is part of my free Java 8 course focusing on clean coding principles.
In this article, I will be giving you a basic overview of the Java class ArrayList. I will first explain the meaning of size and capacity of an ArrayList and show you the difference between them. After that, I will explain some ArrayList methods, divided by the interface Collection and List to which the methods belong to. I will finish off by giving you a few practical coding examples that will, for instance, show you how to add and remove elements from an ArrayList.

ArrayList implements the List interface, which again extends the Collection interface. As is typical of List implementations, we can have duplicate elements in our ArrayList and we can go from element to element in the same order as they were inserted. As the name implies, ArrayList is based on an array data structure. Therefore, ArrayList provides fast access but slow element insertion and removal at arbitrary positions as changes to it require reorganizing the entire list. Fast access, however, is crucial for most applications which is why ArrayList is the most commonly used collection.
As is typical of List implementations, we can have duplicate elements in our ArrayList and we can go from element to element in the same order as they were inserted. Being array-based, it provides fast access but slow element insertion and removal at arbitrary positions as changes to it require reorganizing the entire list. Fast access, however, is crucial for most applications which is why ArrayList is the most commonly used collection. To store data that changes frequently, a better alternative container to use would be a LinkedList, for example.
size and capacity
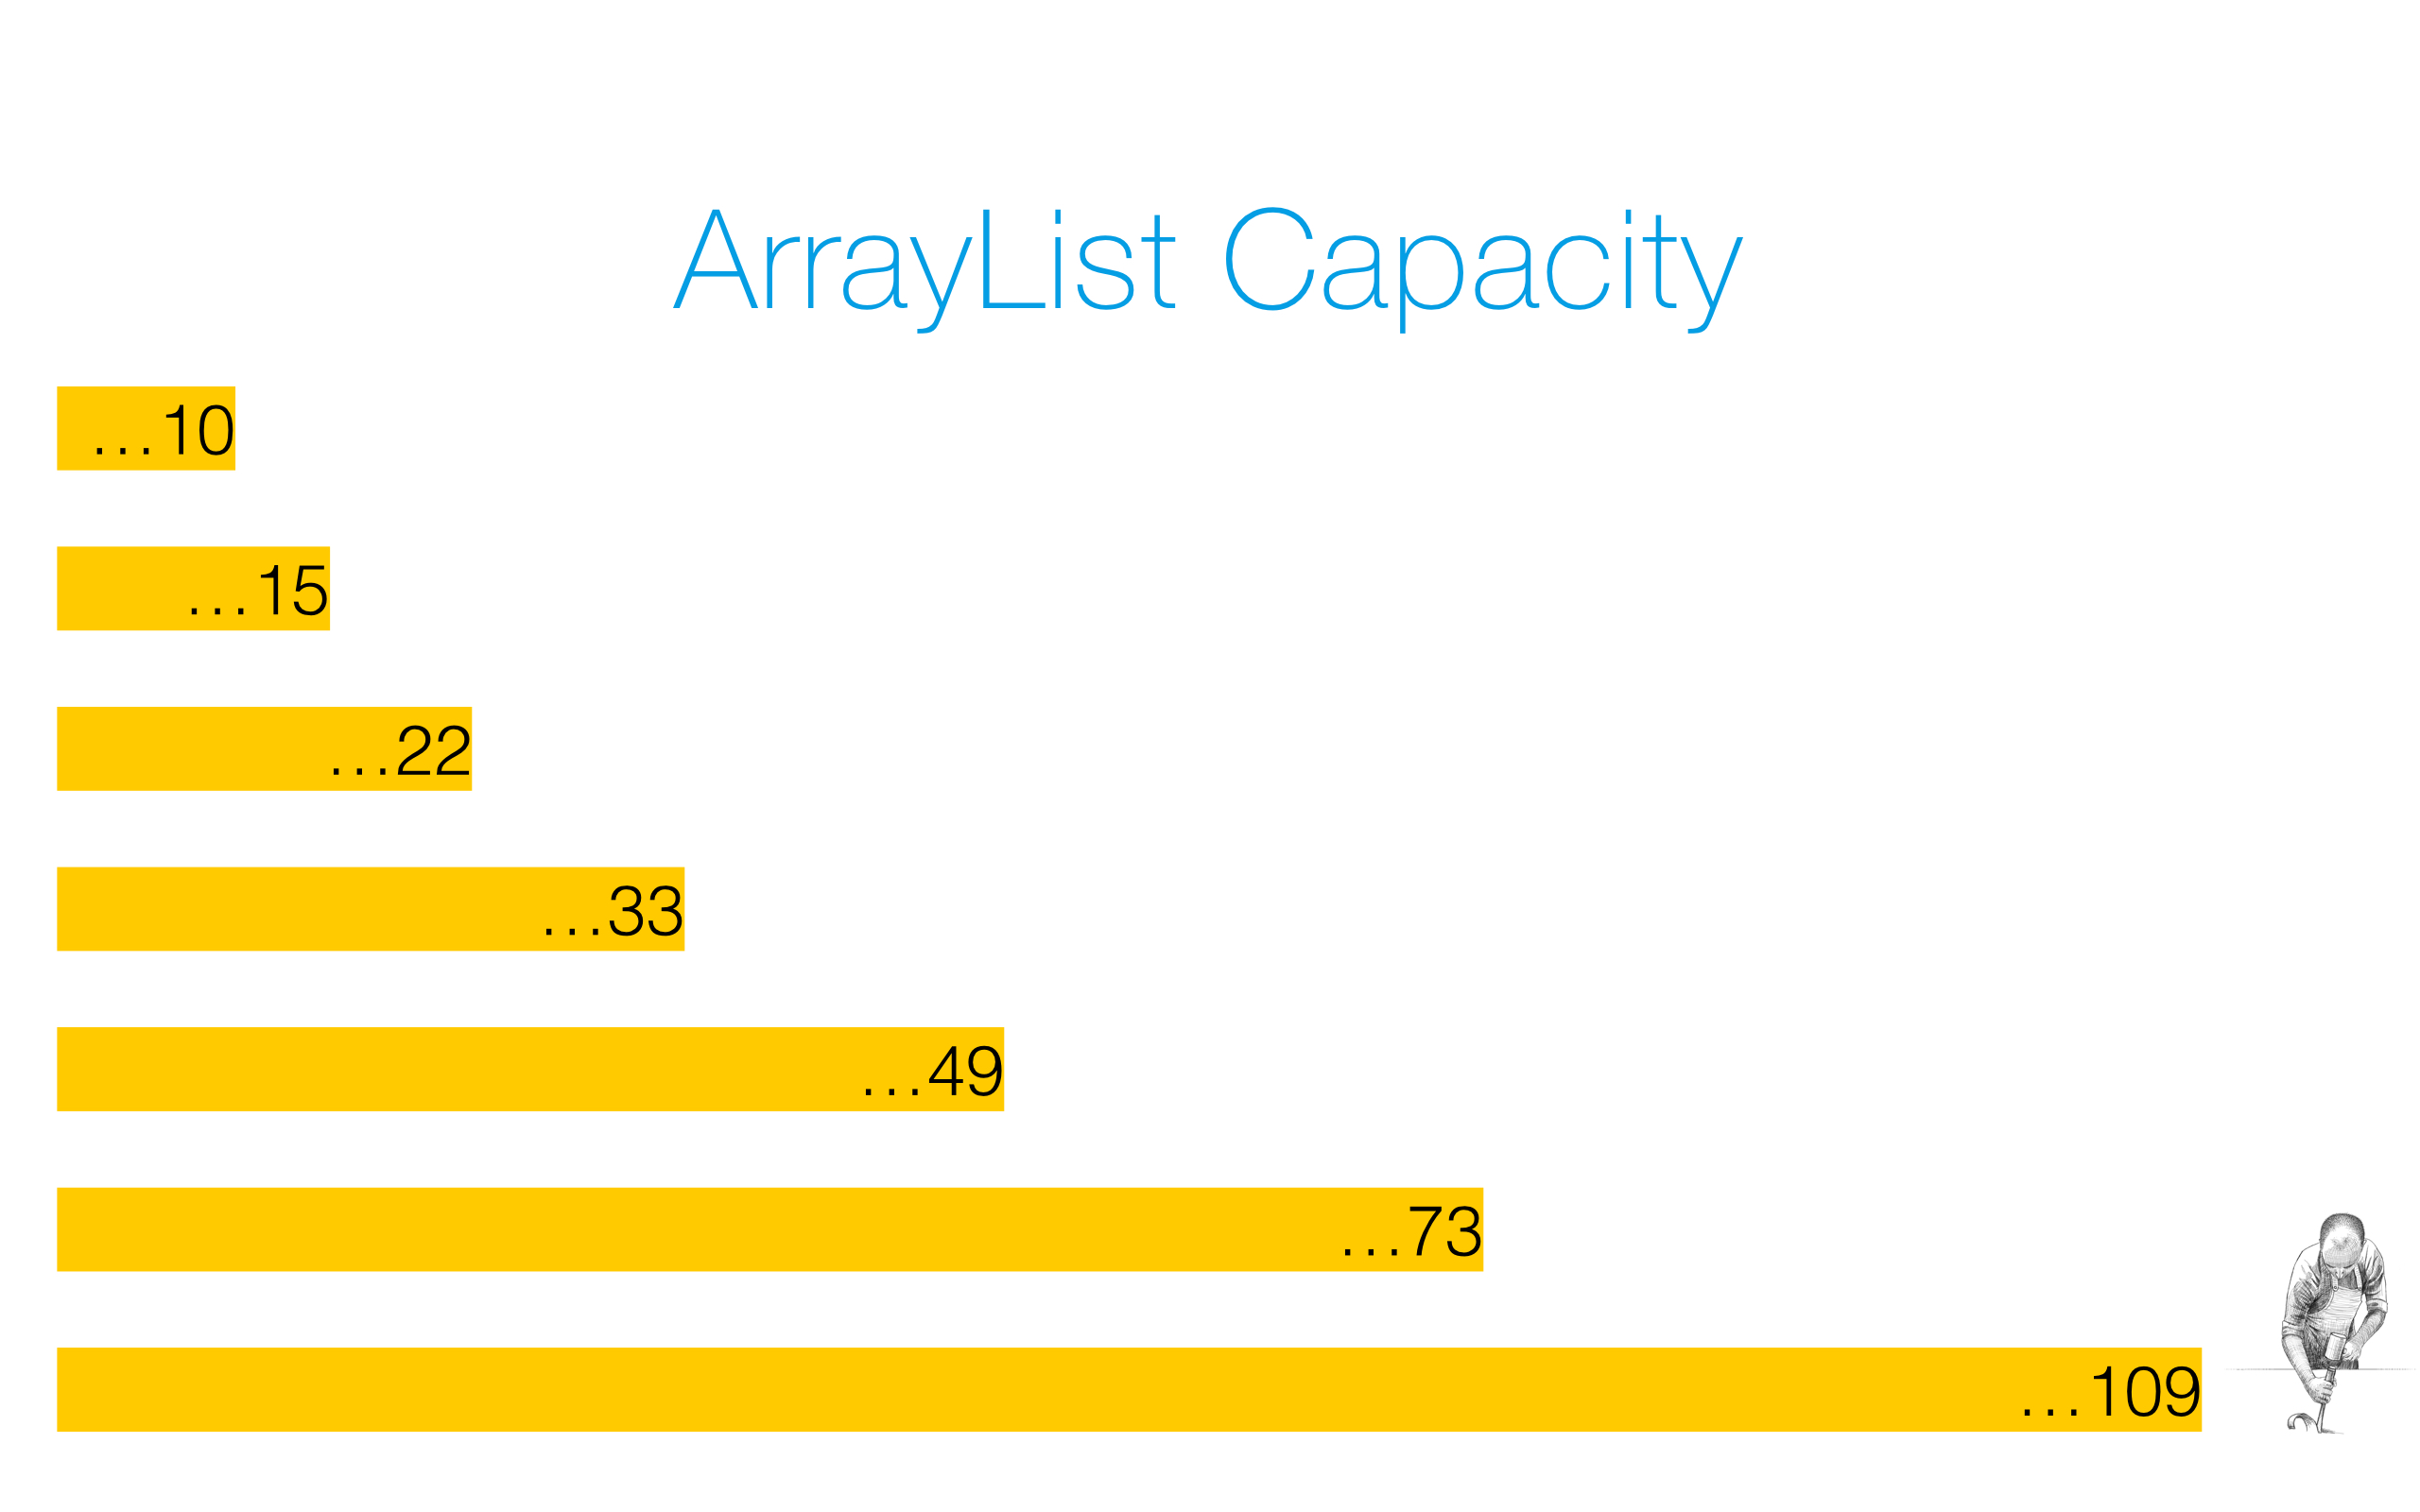
Figure 1
There are two different terms which are important to understand in the context of an ArrayList – size and capacity. Size is the number of elements the ArrayList currently holds. For every element added to or removed from the list, the size grows and shrinks by one respectively. Capacity, on the other hand, is the number of elements the underlying array can hold. The ArrayList starts with an initial capacity which grows in intervals. Every time you exceed the capacity of the array, the ArrayList copies data over to a new array that is about 50% larger than the previous one. Let’s say you want to add 100 elements to an ArrayList with an initial capacity of 10. After all the elements are added, it will have created six more arrays to take the place of the first. More specifically, the first array is replaced with a new array that can hold 15 elements, then a second one which can hold 22 elements, then arrays with capacities of 33, 49, 73 and finally, 109 elements – all of this to hold the growing list as pictured on Figure 1. Inherently, these restructuring arrangements can negatively impact performance.
You can instantly create an array of the correct size to minimize these rearrangements by defining the correct capacity at instantiation. In case you don’t know the final size of the ArrayList before creating it, make the best guess possible. Choosing too large of a capacity can backfire, so choose this value carefully. In addition, it is advisable to always explicitly set the capacity at creation time as it documents your intentions. For most projects, you won’t have to worry about optimizing performance on very powerful hardware, but that doesn’t excuse sloppy design and poor implementation.
public class ArrayList<E> {
    private static final int DEFAULT_CAPACITY = 10;

    private Object[] elementData;
    private int size;

    public E get(int index) {...}
    public boolean add(E e) {...}
[...]
}
Figure 2
Figure 2 shows a very simplified excerpt of ArrayList. As you can see, it is just a class anyone could have written given enough time and knowledge. You can find the actual source code online. However, don’t rely too much on source code internals as they may change any time if they are not defined in the Java language specification. DEFAULT_CAPACITY is the initial size of the array when you don’t specify it as recommended before. elementData is the array used to store the elements of the ArrayList. size is the number of elements the ArrayList currently holds. get, add and remove are some of the many functions ArrayList provides and we will be taking a closer look at them.
ArrayList’s Methods
For convenience, we break up the overview into methods that belong to the java.util.Collection and java.util.List interfaces. 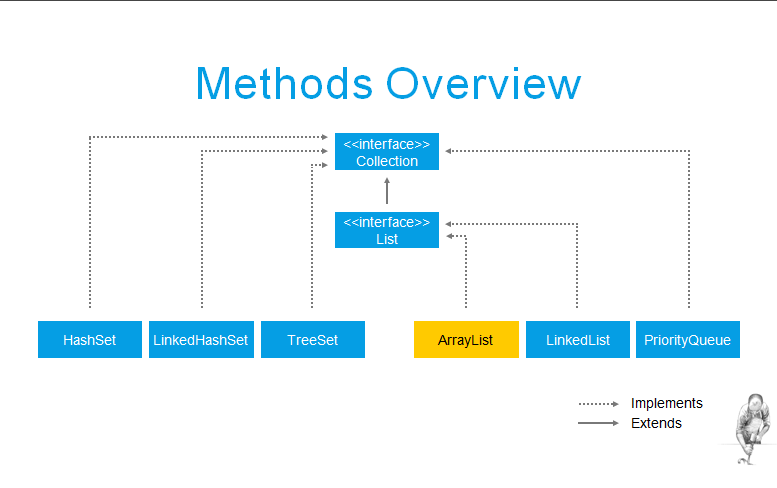
java.util.Collection
The contract of the Collection interface does not guarantee any particular order, implying it does not provide any index or order-related methods. The first set of methods, namely: boolean add (E e) boolean add All (Collection< ? extends E> c) boolean remove (Object o) boolean removeAll(Collection< ?>c) all implement the Collection interface. Note that a lot of what is said here about these methods does not only apply to ArrayList but also to all classes that implement the Collection interface. The method add appends the element to the end of the collection. For ArrayList, the end is the next empty cell of the underlying array. addAll appends all given elements to the end of the Collection. The stuff in the angle brackets is related to generics. In short, it ensures that no one can call such a method with the wrong arguments. remove removes the first occurrence of the element you specify from the Collection. removeAll removes the given elements from the Collection. We now look at the second set of methods, namely: Iterator iterator(E e) int size() boolean contains(Object o). The iterator method returns an object you usually use in a loop to go through a Collection one element at a time, from one element to the next. We say we iterate over the Collection hence the name iterator. size returns the current number of elements in our Collection. contains returns true if the Collection contains at least one instance of the element you specify. Lastly, we look at our third set of methods, namely: void clear() boolean isEmpty() T[ ] toArray(T[ ] a). Clear removes all elements from the Collection. isEmpty returns true if the Collection contains no elements. toArray returns a raw array containing all of the elements of the collection.
java.util.List overrides
ArrayList also implements the List interface. boolean addAll(int index, E element) E remove(int index) E get(int index) int indexOf(E o) int lastIndexOf(Object o) List subList(int fromIndex, int toIndex) int lastIndexOf(Object o) The methods are similar in part to the Collection methods we’ve just looked at but differ in that they require an ordering on the elements of the list. Again, we note that everything we say about these methods typically applies not only to ArrayList but for most classes that implement List. The add method with an index parameter actually acts like an insertion method. It allows you to insert an element at any index position in the list, instead of just adding the element to the end of the list. In the process, the elements of the backing array for ArrayList will be shifted to the right and migrated to a larger array if necessary. The remove method allows removing an element from any index position of the list. Similar to ArrayList’s add method, it might require shifting the remaining elements of the underlying array to the left. The get by index method returns an element from any given position of the list. The indexOf method takes an object and returns the index of the first occurrence of the element in the list or -1 if the element is not found. lastIndexOf returns the index of the last occurrence of the element in the list and as before, -1 if the element is not found. subList returns a subset of the list starting with the position specified by fromIndex, ending one position before the position toIndex. Last but not the least, sort sorts the list following the order of the given comparator.
Declaring a Collection While Instantiating an ArrayList
Later on, we will be going through several code examples demonstrating ArrayList’s methods. In many of our code examples to follow, we create an instance of ArrayList and assign it to a reference variable of type Collection like the one shown on the line of code below.
Collection elements = new ArrayList<>(INITIAL_CAPACITY);
coding session
This might be a bit counterintuitive at first as we would expect our ArrayList instance to be assigned to an ArrayList or at least a List reference variable. There is a reasoning behind this and to cite Robert Martin, “A good architecture is one that maximizes the number of decisions not made or the number of decisions deferred.” We can infer that in many situations, by assigning to a Collection reference variable, we can forward it to other methods and/or other objects and end up not being limited to passing an ArrayList for instance. This is good for us because business requirements usually change very fast and if there were a new requirement stating elements cannot have duplicates, we could just change only one place in the code to instantiate a HashSet instead without having to touch the code that uses our Collection variable. If we were to use a List or an ArrayList everywhere in the code, it would be very difficult to change our mind later on. We would have to touch a lot of code, which is a very dangerous thing to do. Of course, using Collection limits the number of methods we can use as it has less methods than the List interface, but we will come to learn that having access only to the methods we need to use is actually better for us. Later on, we will eventually switch to a List interface to show more methods List brings to the table on top of Collection’s.
As an aside, notice on the same line of code the use of “<>” or the diamond operator that was introduced with Java 7. Since we declare and instantiate elements on the same statement, the compiler infers that our ArrayList is typed to String. This makes our code a bit shorter and reads better. Last but not the least, notice the initial capacity which is a constant previously defined as follows: private final int INITIAL_CAPACITY = 5. We could have easily just directly typed 5 as our initial capacity but we would be writing a “magic number”. This makes it much harder for the next developer reading our code (which often ends up being us) to know what the 5 actually means in this context. We want to explicitly state that we have set an initial capacity for our ArrayList so it is highly recommended to use a named value in order to document our intentions.
Code Examples
Collection Methods
Collection elements = new ArrayList<>(INITIAL_CAPACITY);
elements.add("A");
elements.add("B");
elements.add("A");
elements.add("C");
elements.add("E");
elements.add("E");
for (String str : elements){
    System.out.print(str + " "); // A B A C E E
}
Figure 3
We will be looking at some examples to have a better grasp on what ArrayList is about. We are starting off with the Collection interface method add shown on Figure 3 from lines 3-7. Seeing as elements is a Collection of type String, we can add the Strings into our ArrayList. Although our variable is a Collection, note that the fact that we instantiated an ArrayList allows us to add duplicate elements, e.g. “A” and “E” twice. Recall earlier that the constant INITIAL_CAPACITY, set to 5, is also set as the initial capacity for our ArrayList. On line 8, adding the second “E” will cause our list’s underlying array to create a new array of a larger size, taking all the existing data to a new array with it along with the second “E”. Despite cases like adding the second “E” taking much more time to finish, averaging over thousands or even millions of added elements, each add to an ArrayList will take almost no time at all.
printing an ArrayList
Here are two different ways to print out an ArrayList. We can use its toString method, which println calls when we use it as follows: System.out.println(elements). Lines 10-11 in Figure 3 show another slightly more complicated way. This is because we want to look at how we can iterate over an ArrayList as a consequence of implementing Collection which in turn implements the Iterable interface. Because ArrayList ultimately implements Iterable, we can write Line 10 without worrying about the details required to iterate over this Collection. This is all done for us by the compiler internally. We can use the ArrayList in the for-each loop and print out each element separately, giving us more flexibility. Notice that the Collection is printed out in the same order as the elements were added, i.e. as “A B A C E E ”. Had our Collection been instantiated to some instance of Set, we would not have been guaranteed the same iteration order as is the case with List.
Removing from an ArrayList
We can also just as easily remove elements from an ArrayList. Since we have a Collection variable, we cannot remove by index. The only way would be to remove by specifying the object which internally uses the equals method. In our example, it goes over each element and checks for a match using String’s equals. The first match it finds is removed from the Collection.
Collection elements = new ArrayList<>(INITIAL_CAPACITY);
elements.add("A");
elements.add("B");
elements.add("A");
elements.remove("A");
System.out.println(elements); // [B, A]
Figure 4
You might also notice that we have two “A”s. It is interesting to note that only the first “A” is removed. How do we know for sure? Whenever you come across such questions, a good idea would be to look for a book, a video tutorial, or the API. However, the quickest way to be sure is to write some simple test code by yourself. Because the code doesn’t lie, you will be assured that it behaves as you wrote it. Going by our Figure 4 example, only the first A is removed, leaving elements with only “B” and “A”.
Collection Size
Collection elements = new ArrayList<>(INITIAL_CAPACITY);

System.out.println(elements.size()); // 0
elements.add("A");
elements.add("B");
elements.add("A");
elements.add("C");
System.out.println(elements.size()); // 4
Figure 5
We can also check for the current size of an ArrayList as well as check if it’s empty. On Figure 5, Line 3, we directly print out the size of our Collection after instantiating it. As expected, 0 is printed out since we have zero elements. Thanks to our example, we can rule out the possibility of Line 3 throwing an Exception. On Line 10, after adding 4 Strings, we print out the size again and get 4.
Collection elements = new ArrayList<>(INITIAL_CAPACITY);
System.out.println(elements.isEmpty()); // true
elements.add("A");
System.out.println(elements.isEmpty()); // false
Figure 6
Conveniently, we can check if our Collection is empty, i.e its size is 0. We get true on Figure 6, Line 3 after instantiating to an empty ArrayList and get false on Line 5 after having added “A” to list.
List Interface Method
From here on in, we switch over to the List interface in most of our examples, i.e. we will now have a reference variable of type List, giving us access to all of the Collection interface’s methods and List’s on top of that.
Inserting List Elements
List elements = new ArrayList<> (INITIAL_CAPACITY);
elements.add("A");
elements.add("B");
elements.add("A");
elements.add("C");
elements.add(0, "T");
elements.add(2, "S");
System.out.println(elements); // [T, A, S, B, A, C]
Figure 7
We can insert an element by specifying where to place it using an index. Figure 7, Lines 7-8 show how we can add, say, “T” to the start of our list at index 0 and “S” at index 2 – which ends up being right between “A” and “B” after inserting “T”. Both insertions shift all other elements to the right of the specified index whereas removing elements by index does the opposite, shifting all other elements to the left. Printing it out as shown on Line 10, we get the output [T, A, S, B, A, C].
Removing List Items
List elements = new ArrayList<>(INITIAL_CAPACITY);
elements.add("A");
elements.add("B");
elements.add("A");
elements.add("C");
elements.remove(1);
System.out.println(elements); // [A, A, C]
Figure 8
Let’s say we want to remove the second element from our list. As Figure 8, Line 7 shows, we do this by calling remove with index 1. This removes “B” from our list, leaving us with the elements [A, A, C]. However, you will find that you rarely need to use these index-based methods and can instead opt to use Collection’s.
List Size
int initialCapacity = 100;

// backing array starts at length of 100

List elements = new ArrayList<> (initialCapacity);

elements.add("A");
elements.add("B");
elements.add("A");
elements.add("C");

System.out.println(elements.size());
// size is 4, not 100!
Figure 9
Our Figure 9 example starts off with declaring an initialCapacity of 100. The example shows the difference between the capacity and the size of an ArrayList. Recall that size is the current number of list elements while capacity is the length of the list’s backing array. In our example, our list is initially set to a capacity of 100 elements. After adding four elements, if you fire up a debugger and break the execution by stepping into the ArrayList class before running Line 11, you will see that the internal array elementData still has a length of 100 while our size grows to 4.
Getting Element Indices from a List
Sometimes, you will want to ask for the index of a certain element in a List. The List interface gives us two methods to do that – indexOf and lastIndexOf. Since Lists allow for duplicate elements, to get the first index of an element, we would use indexOf. If we call indexOf with “A”, we get the first index, 0. To get the last index of “A”, we would call lastIndexOf, which returns 2. You can see all of this in action in Figure 10.
// backing array starts at length of 100

int initialCapacity = 100;
List elements = new ArrayList<>(initialCapacity);

elements.add("A");
elements.add("B");
elements.add("A");
elements.add("C");

System.out.println(elements.indexOf("A")); // index: 0
System.out.println(elements.lastIndexOf("A")); // index:2
Figure 10
Clearing a Collection
Collection elements = new ArrayList<> (INITIAL_CAPACITY);
elements.add("A");
elements.add("B");
elements.add("A");
elements.add("C");
System.out.println(elements.isEmpty()); // false

elements.clear();
System.out.println(elements.isEmpty()); // true
System.out.println(elements); // []
Figure 11
To remove all the elements from a Collection, we use the clear method. It will empty the list so that if we call isEmpty on a list with elements, true is returned. This is demonstrated on the code excerpt in Figure 11. Interestingly enough, on Line 11, we learn that printing out an empty list doesn’t throw an Exception. Instead, it only prints out a pair of square brackets, “[]”.
Oracle Java 8 Documentation
java.util.Collections
java.util.List
java.util.ArrayList
Subscribe now to receive monthly updates on my Java course and a 20% discount on my upcoming course.
Additionally, you will receive:
- a printable pdf of this tutorial
- additional printable course material
- an exclusive video tutorial about the hashCode function
Enter your email address to get these exclusive offers now.